Quick Links
Instructions for Using the RDF Cataloging Tool at:
https://ld4pe.dublincore.org/rdf/lrmi/#/resource
Describe a Resource
- Copy and paste the URL of your resource into the field “URL”.
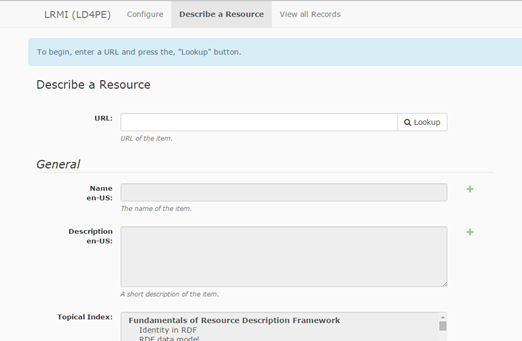
Click the button “Lookup”.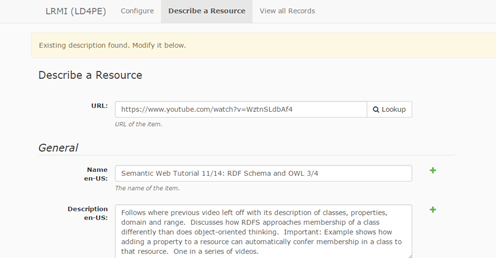
The URL serves as the unique identifier for each resource in the triple store.
If there is already an entry for the resource, a message stating “Existing description found” will appear near the top of the screen. The description itself will also be pulled up, allowing you to edit any of the previously entered fields.
If the resource has not been cataloged before, the message “No existing description found” will appear, and you can began creating one from scratch.

General
- The “Name” field is just under the URL field. This is where one gives the resource a title.
- Next is the “Description” field, where one can enter a brief descriptive paragraph describing the resource in plain language.
- The next field, the “Topical Index”, is where one selects the categories which best describe the topics covered in the resource. These are the broadest categories of the Index and are used as a navigation tool for users to browse the resource collection when they have a general rather than a specific idea about the type of resource desired. The scroll bar is used to move up and down the list. To select an item from the list, click on it with the mouse. To select more than one consecutive item, hold down the SHIFT key while clicking. To select nonconsecutive items, hold down the CTRL key while clicking. This is an important skill to master, as many resources will cover topics from more than one area of the index.
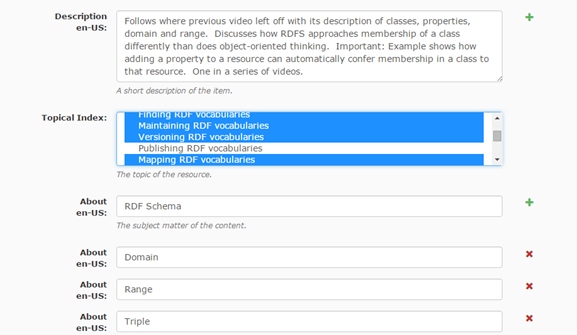
- The next field, “About”, is where you may enter terms (word or short phrases), describing the resource for the purpose of generating keywords, which will be used by users to search the Index. In order to enter more than one term in this field, simply click on the green plus-sign next to the field and an additional empty box will be created. To delete a term or an unused empty box, click on the red x next to the field.
- The value of the “In Language” field cannot be changed from this screen, and is set to the default “English”. If necessary, this field’s value can be changed from the “Configure” screen.
Rights
- The “Author” field is next. The format for this field is Last Name, First Name. To enter more than one author for a resource, or delete an unnecessary entry, follow the same procedure described for the About field.
- The “Publisher” field is next, and works similarly to the Author field.
- The “License” field is next. Rather than entering a statement, such as W3C Copyright 2015, our practice has been to enter the URL to the license itself. For example, for the Creative Commons CC-BY 4.0 License, enter https://creativecommons.org/licenses/by/4.0/.
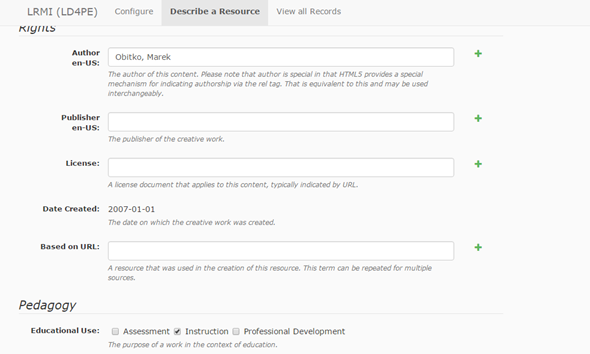
- In order to enter a date in the “Date Created” field, one picks from a Date picker menu.
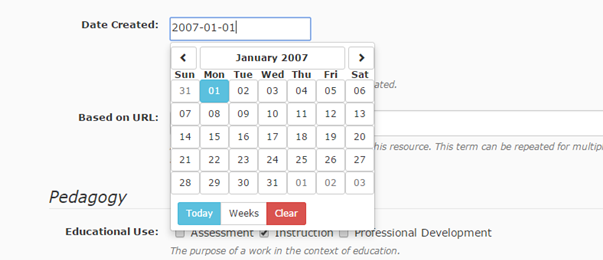
The left and right arrows near the top of the Date picker are used to toggle forward and backwards through months. Clicking on the box containing the current month and year (in this example, January 2007) brings up a menu of all twelve months in that calendar year. Clicking on the same box again brings up a menu of the twenty-year period the month falls within (in this example, 2001-2020). This allows one to select a different month and year without having to toggle, which is useful when the desired date is not close to the currently displayed date.
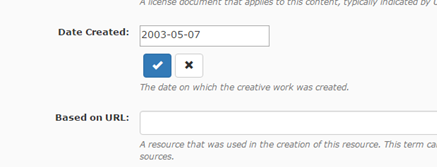
When finished selecting the desired date, be sure to click on the blue check mark, otherwise the date will not be saved.
- The “Based on URL” field is one which is not commonly used. It should not be considered to be equivalent to dc terms “relation”. It is not enough that a resource simply has a relationship with another resource to warrant using this field; rather the other resource must have been used to create the resource being described (e.g., a quiz which covers the material from a reading or learning module).
Pedagogy
- “Educational Use” is used to indicate the purpose of the work; to assess, instruct, or aid in professional development. One or more of the three options can be selected by clicking the appropriate boxes.
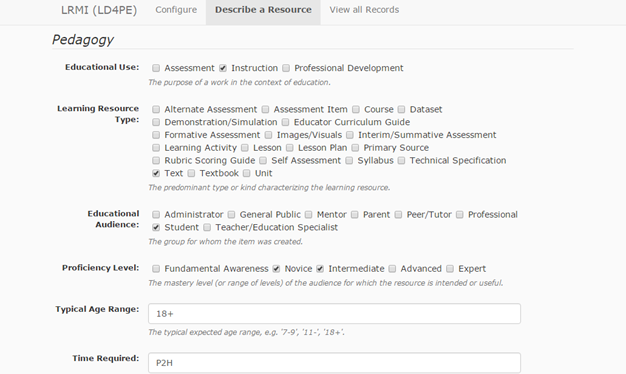
- Similarly, as many boxes as necessary may be checked within the field of “Learning Resource Type”.
- “Educational Audience” operates the same as the Learning Resource Type field.
- As does the “Proficiency Level” field. Practice has been to select every field of which the members are likely to benefit from a resource. In other words, if both a “Novice” and an “Intermediate” user would likely find the resource useful, then both boxes are checked; if the same resource is deemed too elementary for an “Advanced” user, that box would remain unchecked.
- For “Typical Age Range”, the same value has been entered for every resource so far- “18+”. The logic behind this has been that the subject matter “Linked Data” does not easily lend itself well to an age group classification the way a subject such as “Math” or “English” does.
Since the subject “Linked Data” seems unlikely to have come to a user’s attention outside of an academic field (such as Information Science) or a professional work setting, we have chosen the arbitrary value “18+” to reflect this- it is not meant to suggest that a younger user could not understand the material. - “Time Required” is an estimate of how long it might take a user to consume the content of the resource. For a video, it is simply the duration in hours and minutes. For other types of resources, this may reflect time reading text, studying diagrams, answering quiz questions, or working through exercises.
- “Interactivity Type” reflects how the material is delivered to the user. “Expositive” is used for material that one simply listens to or reads. “Active” is used for material that requires one to answer questions, work through exercises, or click on links to explore and navigate through the resource. “Mixed” is used when a resource has significant elements of both “Expositive” and “Active”.
Competencies
- “Competencies” is both similar and different from the earlier field, Topical Index. It is similar in that it is used to categorize the resources for the purpose of browsing. It is different in that it provides a finer level of granularity. Competencies describe specific concepts and/or skills which a user will understand and/or know how to complete after consuming the resource. Each of these competencies falls under one of the higher level topics described using the Topical Index field. The purpose of the Competencies field is to allow users to navigate through the resources when they have a good idea of the concepts and/or skills they wish to learn.
The competencies field is the most complex field to fill in, due to the large number of possible entries from the extensive Competency Index (CI). It is recommended to have a copy of the CI at hand when describing resources, but the cataloger is also aided by the ability to type in a keyword (such as SPARQL) into an empty box in this field. Doing so will bring up a list of competencies which contain this keyword, allowing the cataloger to choose from among them.
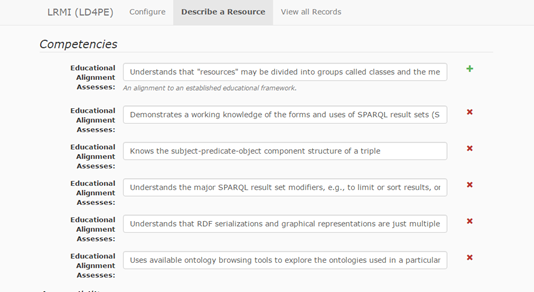
If no competency currently exists which accurately describes a concept or skill taught by the resource, the cataloger should make a note of this and send a suggestion to the Competency Index Editorial Board (CIEB).
Accessibility
- “Accessibility API” indicates that the resource is compatible with the referenced accessibility API.
- “Accessibility Control” identifies input methods that are sufficient to fully control the described resource.
- “Accessibility Control” is used to indicate content features of the resource, such as accessible media, alternatives and supported enhancements for accessibility. “Captions” and “Table of Contents” are two common features one indicates using this field.
- “Accessibility Hazard” is a characteristic of the described resource that is physiologically dangerous to some users. Note that there are boxes to check to indicate both the presence of and the absence of three types of potentially harmful characteristics: “Flashing”, “Motion Simulation”, and “Sound”.

- Last, but not least, when one is done with an entry, click the “Submit” button at the bottom of the form. A message should appear at the top of the screen announcing that a number of triples have been saved successfully. Conversely, clicking the “Delete” button will remove all of the triples from the resource being described from the triple store (i.e., it deletes the entire description). Be sure that this is one’s intended result before clicking Delete.
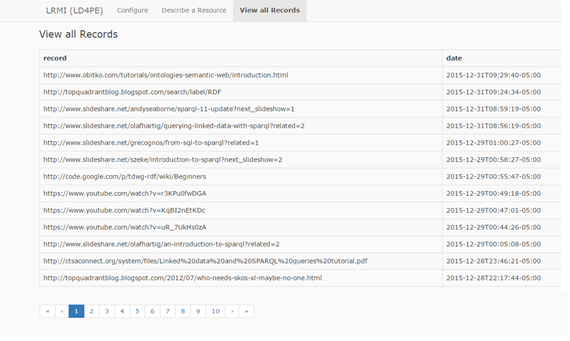
- If one wants to confirm that the resource has indeed been entered into the triple store, click on the “View All Records” tab at the top of the page. This brings up a screen which shows the URL, as well as the date and time cataloged, every resource currently saved into the triple store.
